Thursday, December 28, 2017

Setup Training, Chassis settings for the iRacing FR2.0

Setup Training, Chassis settings for the iRacing FR2.0

Springs, Dampers and ARB

Intro:

The term Vehicle Dynamics describes a field of art, science and engineering that attempts to describe the behavior of a vehicle while in motion. Like Aerodynamics, it is a highly complex field of study. There are thousands of pages written about the subject. The book, Race Car Vehicle Dynamics by Milliken and Milliken is considered one of the most important collections of information. Below are a few links for those interested in doing a lot of reading and thinking,


Fortunately, we don’t need to design the car.  We simply need to understand how to make it go fast!  So this article (based on significant testing) will focus on some very basic core principles that can be applied in the process of building a setup that will allow our best lap times for the FR2.0.

Vehicle Dynamics and Chassis Set Up is pretty much all about making the car go thru corners quickly and that is highly related to how the weight on the tires changes through the corner.

So, since the car is essentially “held up” with spings, it is the springs that we will address first.

Formula race cars generally use a “coil over” spring or springs.  The coil spring is located around or over the damper. (Americans call them shocks—Europeans call them dampers).The most typical is one coil over assembly (spring and damper) for each wheel. A typical design (if there is such a thing) is shown below.


The coil over is connected to the wheels thru a quite clever and complex series of rods, and rockers.  Most of this complexity is so that the coil overs can be located inside the body, so as to improve aerodynamics. The typical rear set up is often quite similar to the front.

Many iRacing drivers are familiar with the Pro Mazda that uses this conventional four spring design.

The F2.0 uses a special “monoshock” design for the front.  Instead of two springs, the entire front is held up with one coil over. There are a few variants of the monoshock concept, but the principle is simple. The first photo below is a Dallara IndyCar prototype. The second is one of the early FR2.0.


Photo of FR2.0 Front “Monoshock” and Spring—see link: http://www.motoiq.com/MagazineArticles/ID/4322/PageID/10853/LRS-Formula-at-Magny-Cours.aspx

Europeans familiar with the Mygale Formula BMW will know that it too used a monoshock to save weight. The Mygale design was different in that it used a more traditional ARB rather than the sliding crank.

On a conventional design, each wheel is supported by it’s own spring/damper allowing wheel movement on one side independent of the other. Under straight line braking for example, both wheels move the same distance, compressing both of the spring/damper coil over assemblies. When the car rolls in a turn or strikes a curb, only one wheel moves.

To improve handling, and reduce body roll, the Anti Roll Bar or ARB is added to the design—essentially connecting the two wheels with a torsion bar. Now the wheels no longer move independent of each other. When one wheel goes up relative to the chassis, the torsion bar is twisted and applies an upward force to the other wheel. (Keep in mind that the wheel  generally stays on the ground, so when we refer to the wheel going up—it really means the chassis is moving down relative to the ground and the wheel is moving up relative to the chassis. )

Here is a Youtube about ARB’s.

This conventional design is what is used for the rear on the FR2.0.

But, with the front “monoshock” things are quite different.  Each wheel is connected to other via the rods connected to the solid “crank”. Under straight line braking for example, both wheels move the same distance, rotating the “crank” and compressing the single spring/damper coil over assembly. When the car rolls in a turn or strikes a curb, since they are connected, when one wheel moves, instead of the “crank” rotating, the “crank” slides on a shaft and compresses a spring. The lateral spring, hidden from view in the photo is inside the sliding mechanism.  So, when the car rolls in a turn, when one wheel moves up, the other moves down with the relative motion resisted by the hidden spring.

From our point of view, the most important consideration/s regarding this design are:

A--The roll resistance of the monoshock assembly in the iRacing FR2.0 is generally much lower than would be the case for a conventional two coil-over with ARB design. The roll resistance of the front suspension for the iRacing FR2.0 is also not adjustable. (In real life the internal lateral spring can be changed and adjusted.) The roll resistance of the front is only slightly affected by the spring rate on the coil over.

B--There is no damping forces against chassis roll on the front assembly. All of the damping forces in chassis roll is accomplished with the rear dampers.

One thing for sure—the design on the FR2.0 works very well and properly setup, handles as well or better than a car with the more conventional design.

Just for fun, let’s take a look at how the suspension interacts. Basically, I increased the Pushrod length on the right rear from 21.450” to 21.481”. This is an increase of 31 thousanths of an inch, or 0.8 mm. This would be like having a “weight jacker” like the IndyCar uses, or would be like adding “wedge” on an oval. Weight is transferred diagonally. (Starting weights were 278# front and 369# rear)

With the rear ARB disconnected, the RR weight was increased by 12 pounds. The LF was increased by 121 pounds. The RF and LR corner weight was decreased by 12 pounds each.  

This was good news in that the car behaved pretty much like a typical race car.

Now, I connected the rear ARB, set on a low P1-Stiff setting. Results are shown below. Weight change on each “corner” was cut in half to 6 pounds, with the ARB doing it’s intended function, as it was “twisted” to 13.8 ft-lbs.


All this exercise provides is some insight into the function of the ARB.  By adding “Wedge” to the the RR, the RR is placing a torque on the ARB that pushes down the LR. So the ARB transferred 6 pounds (50% of the normal cross weight transfer) from one side to the other on both the front and rear.  

I did the same test with an ARB setting of P4–Stiff which resulted in an ARB torque of 21.4 ft-lbs. and a transfer of 66% of the normal cross weight transfer. 

When the chassis rolls in a right turn, as opposed to the weight jack or wedge test, the ARB would be pulled up (relative to the chassis) making the RR suspension more stiff,  and would reduce the weight on the inside LR and increase the weight on the LF. This would reduce body roll, make the rear have less grip and the front have more grip.

Do not underestimate the effect of the ARB on the iRacing 2.0. Increasing ARB will be most powerful from Mid Corner to Corner Exit and will dramatically decrease the traction available on the inside rear tire under acceleration.

Here is a post by my friend, Diederik Kinds who is a Race Engineer on a team that ran the FR2.0: 

I worked with this FR2.0 for years. It has an adjustable front ARB system with Bellevilles as depicted in the parts manual, but the pics are not the Tatuus FR2.0 but they look very similar.

There are a lot of Belleville variations for the FARB (preloaded and non-preloaded), none of which are modelled in iRacing.

When the iFR2.0 came out I immediately shot off a mail to iRacing about some setup inconsistencies - 1 about damping settings (bump and rebound were switched) which were subsequently adjusted and the other about lack of FARB adjustment.

I will just copy/paste the answer here:
"In regards to the FARB, essentially the stack system functions like a controlled, and exceedingly stiff, slack rate around center. Because most settings are much too stiff for our numerical integration step we've pegged bar rate to coupled installation stiffness and chassis torsion. This method was the only one, within the iRacing constructs, to allow all available RARB options. The alternative options would have been more restrictive."


On should always keep in mind that settings affect the car the way that iRacing chooses, "within iRacing constructs" as mentioned above ---and their choices may change from time to time. So always test to confirm settings continue to do what you think they do. The iRacing FR2.0 is an iRacing simulation of the real FR2.0. 


Spring selection for the FR2.0 is relatively simple. For the front spring, you can choose 700#, 800# or 900#. For the rears, 800#, 900# or 1000#.

The “correct” choice depends a lot of Driver Preference. Notice I do not use the term Driver Style. 

Our high speed “test track” for aerodynamics was Talladega Speedway. For testing of the car in corners,  we go to the Centripetal Circuit. (Centripetal force is defined as, “The component of force acting on a body in curvilinear motion that is directed toward the center of curvature or axis of rotation,” while centrifugal force is defined as, “The apparent force, equal and opposite to the centripetal force, drawing a rotating body away from the center.  So we are testing the Centripetal force produced by the tires of the car.)  I generally go to the lane fourth from the outer one. We run the test at 123-124 mph at part throttle, burning 0.5 gallons of fuel—then we measure tire temps to see changes due to changes in spring rates.


Test 1: Running “full” 31/12 downforce, with 700# front spring and 800# rears, with an ARB setting at P1-Stiff.  Result:  Front Total 1036; Rear Total 1048, slight increased wear and temp on RF. Essentially close to balanced or “neutral” at part throttle.  (See above)

Test 2: Same settings as Test 1 except: 800# front spring and 800# rear spring. Same result as Test 1

Test 3: Same settings as Test 1 except: 900# front spring and 1000# rear spring. Same result as Test 1

Conclusion: While spring rates will dramatically affect handling and “feel” when the car is in “transition”, slowing down, accelerating, entering the corner or exiting the corner; spring rate choice will have less effect on the car’s grip and handing in a “steady state” turn. This may surprise many, including oval track racers who change springs to effect handling,  but keep in mind that even on an oval track, there is a significant period of time when the car is in “transition”.

A useful learning exercise is doing this test and noting the way the car responds to throttle. The car will turn more tightly when the throttle is released and then will want to track out at full throttle, with no change in steering input. So the car can be steered with throtlle by changing weight transfer from rear to front and back. Learning how to control this will make you faster.

The higher spring rates will result in a faster reaction to the throttle’s steering effect..


Test 4:  Same settings as Test 3 except: ARB set at P5-Stiff. With maximum stiff springs and maximum ARB, the car was quite “twitchy” with very fast reaction to changes in throttle. Car spun when I released throttle at end of test. (See above). Result:  Front Total 1041; Rear Total 1064, RR tire wear now same as RF. Note higher LF tire temps resulting in more weight transferred there by the stiff ARB.  Essentially still close to balanced or “neutral” at part throttle but more tending toward oversteer. 

A good video about spring rates:


Now let’s address the Dampers.

The video will define some terms:


Simply put, springs primarily determine the distance the suspension travels and dampers primarily determine the speed the suspension travels.  Note I said, “primarily”.  With a given force, a stiffer spring will be compressed less, so a stiffer spring does not need to travel as far—hence, given a certain damper setting, the stiffer spring will absorb a given force more quickly. In addition, in a “dynamic” scenario, where force is momentary or short in duration, a stiffer  damper can reduce the distance the suspension travels.

Don’t over-simplify and don’t over-complicate the picture.


Above is the iRacing Setup Screen showing Maximum Compression (Bump) 0 and Maximum Rebound Stiffness 0.

Following is the iRacing Setup Screen showing Minimum Compression (Bump) 40 and Minimum Rebound Stiffness -2.  There is 40 “clicks” from Maximum to Minimum Bump. There are 8 “clicks” (0, -.25, -.50 etc to -2.0) from Maximum to Minimum Rebound.

NOTE: THERE IS A BIT OF CONFUSION REGARDING THIS, AS “RIGHT” CLICKING DECREASES BUMP AND INCREASES REBOUND DAMPING. (Some people assumed that right clicking always increases the setting—this is NOT the case for Bump damping settings. I WILL ADDRESS THIS WITH SOME TEST RESULTS LATER.


Below is a sample real iRacing Setup Screen (Sample 1) (This one in the hands of an outstanding driver matched the world record at TT conditions.)


Below is another real iRacing Setup Screen (Sample 2) with “softer” Bump Damping and considerably “softer” Rear Rebound Damping.


It is often a surprise that the typical racing damper has more damping force in Rebound than in Compression Bump. The reason is that the spring absorbs most of the compression force applied by bumps and cornering, while the spring is working against the damper in Rebound.  Hence, choosing the correct Rebound setting is often more critical.  40 clicks for a smaller force makes each click less in magnitude for Bump compared to 8 clicks for a much larger damping force.

Here, following are two charts. The first is a graph showing data from Penske Shock’s dynometer for custom shocks they built according to specs I provided. The shocks were for a very competitive SCCA Formula Vee I raced and won with at Summit Point. 


The next graph illustrates the dampers on the iRacing 2.0, for the purpose of understanding the damper settings. I inserted notes on a graph provided by Penske Shocks for a “typical” double adjustable damper. (The actual data (force and velocity) is not exactly the same as the FR2.0.


OK, let’s go back to that earlier NOTE: THERE IS A BIT OF CONFUSION REGARDING THIS, AS “RIGHT” CLICKING DECREASES BUMP AND INCREASES REBOUND DAMPING. (Some people assumed that right clicking always increases the setting—this is NOT the case for Bump damping settings.  I have tested the dampers extensively running telemetry at the very bumpy Sebring International and Lime Rock where the car goes airborne.  The test at Sebring was to primarily test if the dampers could be set at extremes that would “jack up” the car or “clamp down” the car over a bumpy track. The results indicated that neither was an issue.

The test at Lime Rock provided an excellent “picture” of the damping. Below is the first result with Maximum Bump and Rebound Damping.


Next, following is the result with Minimum Damping.  In both results, you can clearly see the car “launch” and go fully airborne with a bit of “twist”.  As the car “lands” first on the left tires, it is clear that the setting of 40 compression allows much faster and larger suspension travel (same springs) than the 0 setting. With the lesser damping setting of 40, the damper is traveling almost twice as fast and the car falls 0.80” inches  (20mm) closer to the ground, almost bottoming out.

One can also see clearly that the car bounces significantly less with the higher compression and rebound damping.  Once the car “bottoms”, the subsequent rise is significantly more with the lower rebound setting, and “overshoots” by more than 0.50” above equilibrium.


Well, that’s a lot of info, but let’s summarize as a group of three ABC's.

Springs

A---Stiffer springs reduce suspension travel and chassis roll, and make the car faster to respond to initial steering input. (Although this effect is less for changes in the front monoshock.)

B---Stiffer springs makes weight transfer to the front tires under braking occur faster. (This may require more front brake bias to avoid rear wheel lockup or conversely may reduce the possibility of front brake lockup.)  And weight transfer to the rear under acceleration occurs faster. However, most often for maximum drive out of a slow hairpin, weaker springs on the rear often allow for better acceleration.

C---Stiffer springs often allow the tires to come off the ground or “unload” on a bumpy track as their static compression is less. If the track is bumpy, stiffer springs may reduce grip significantly. (Watch the video.) Stiffer springs reduce the likelihood of the car bottoming when hitting a bump.

  
Dampers

A--Stiffer front and rear bump and rebound damping reduce suspension travel and make the car faster to respond to initial steering input. (Although this effect is less for changes in the front monoshock.) Reducing rebound damping can make the inside tires have more grip in a turn.

B--Stiffer front and rear bump and rebound damping makes weight transfer to the front tires under braking occur faster. (This may require more front brake bias to avoid rear wheel lockup or conversely may reduce the possibility of front brake lockup.)  The first adjustment is typically to  reduce the rear rebound to keep the rear stable under braking—this will also help to keep the rear tires on the ground when cresting a hill.

C--Stiffer front rebound and stiffer rear bump damping will make weight transfer to the rear under acceleration occur faster. (The stiffer front rebound is sometimes counter-intuitive. And, you may NOT want fast weight transfer if you are experiencing wheel spin.)

Anti Roll Bar (ARB)

A--The rear ARB will reduce chassis roll. Stiffer settings reduce more.

B--The rear ARB will take weight from the inside rear tire and transfer much of that to the inside front tire.

C--The rear ARB will dramatically change the “balance” of the car as there is no adjustment to the front.  Keep the setting the least stiff as possible (Do not disconnect) while still achieving desired rotation from apex to track out. (We will focus on this again in the article about the locking differential.)

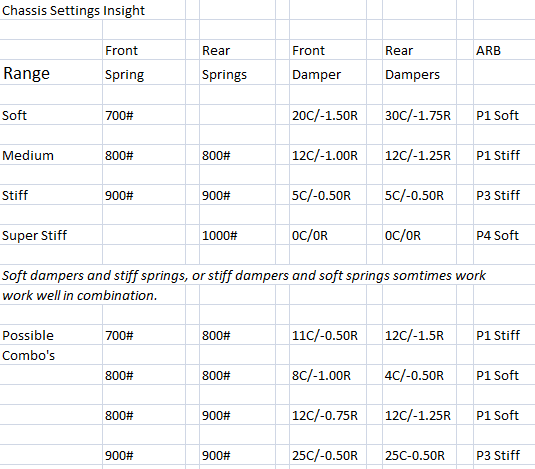
The following chart will provide some insight as to the ranges for spring choice, damper settings, and ARB settings.  You might experiment with the “Possible Combo’s” settings, changing damper and ARB settings for given spring choices, but they are not intended to be recommended “baseline” settings. You will need to consider the other important settings for camber, toe, tire pressure, and differential settings—all to be covered in future articles. All of these settings are related.  Your “baseline” settings for you is what matter. (You will recall, I suggested having three—which would then allow you to have a starting point for different groups of tracks.)  But to create a baseline for you,  you will require a bit of experimenting and testing.


You will recall that I mentioned that chassis settings often have to do with driver preference.  I tend to think of drivers fitting into one of two major categories:

The “High Frequency” types that probably relate to driving racing karts. They prefer the car to be stiff and react to inputs very quickly.  They usually have fast reflexes and enjoy making numerous and rapid corrections to steering, braking and throttle inputs as necessary when they exceed the limits.

The “Low Frequency” types that probably relate more to piloting airplanes. They prefer the car to be less stiff and react to gradual and deliberate inputs, gradually. They desire the car to navigate the corners with stable and deliberate inputs to create a smooth arc of travel, with few corrections being necessary—seeking to always to reach but not exceed the limits.

Both types can be very fast—but the set up needs to “fit” their preference. To be fast, you must keep the car as close to the limit as possible at all times. And, remember that a confident driver is a fast driver!

One final note. iRacing has a minimum ride height. The iRacing FR2.0 generally is fastest with the lowest front ride height allowed that will not result in the car bottoming out, hitting curbs when straddling them, etc. Rear ride height is determined by the desired rake and the same restriction of not bottoming out. 0.4 to 0.6 inches static rake is a good place to start.   

Softer springs tend to result in lower dynamic ride height, but often require a bit more compression bump damping.

You can test ride height with telemetry like Motec or Atlas, but a poor man's quick way is to simply use the iRacing replay camera, adjust the chase view so that your eye is at road level and watch the air gap under the car. iRacing will even display sparks when you bottom out!

Tuesday, December 26, 2017

Aero and Gearing Setup for the iRacing FR2.0 Part 2

Aero for the iRacing FR2.0 Part 2
Wings, Rake and Drive Train--Practical

Intro:

OK, now with some basic background information gained from testing, let’s get practical and work on just how to choose the ideal aero settings. First, we have to choose a reasonable starting point, and then we need to understand the cause and effect of adjustments.

To start, let’s hear what two really fast guys had to say recently in the iRacing Forum:

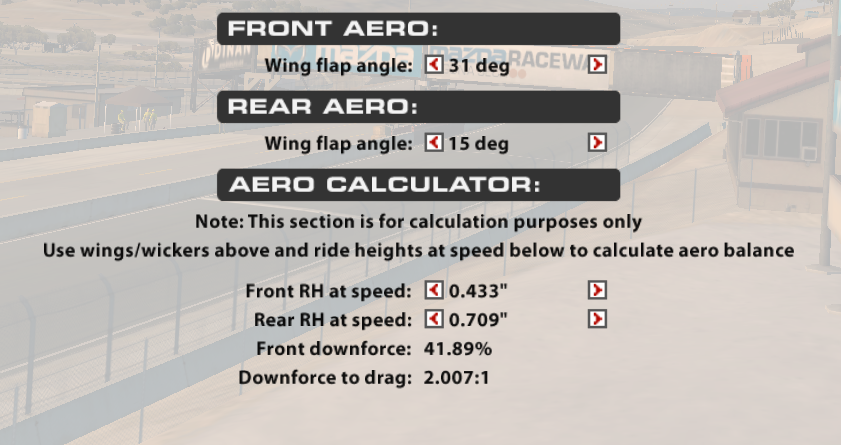
“The vast majority of tracks in this car will be 'full downforce', meaning 31 front and 12/13 rear. This car is very low drag even with the wing on it so unless a track has very very long straights you can usually turn the wing right up and gain speed.

Ultimately you just have to test and see what is faster, but glancing at the schedule, Laguna Seca will be full downforce, so will Donington.  Silverstone, Canadian Tire and Road America may slightly reduced.”

---Thomas Jordan (iRating=6311)

and

 “I did some testing in Watkins Glen today and managed a 41.9. Replay is attached and hope it helps someone to analyse. I was driving a high downforce-setup with 31/15 wings.”

----Fredy Eugster (iRating=8011)

Take a look at the following diagram. We will use it to generally compare the advantages and disadvantages of high and low downforce. The car approaches point “A” at high speed, under full throttle. The driver “lifts” and begins braking.

In the Braking Zone from “A” to “B”, the car with high downforce will have an advantage. Brakes can be applied later and harder since the tires have more grip. The ideal relative front vs rear wing settings are affected by brake bias, spring and damper settings.


As the car approaches the Corner Entry Zone, brakes are modulated (reduced) and steering input is added. Again, high downforce generally provide an advantage here.  Higher downforce produces the biggest advantage in the Mid Corner Zone, although the relative front vs rear wing setting is also very important, Too much relative rear wing will cause understeer; too little will cause oversteer. In addition, the ideal front vs rear wing settings are affected by other set-up parameters, such as spring, damper, ARB and camber settings as well as rake--and especially the differential settings.

Another important factor in Mid Corner is driver input in the Mid Corner Zone as well as driver input in the prior Braking and Corner Entry zones. (Faster entry and trail braking will produce more rotation.)

As the car approaches the Apex, and the Corner Exit Zone, full throttle is introduced as steering input is reduced. Again, higher downforce generally produces an advantage.

So, from points “A” to “D” and to the Track Out, higher downforce produces an advantage. But, at that point the higher drag that accompanies higher downforce will reduce acceleration, resulting in an average lower speed from points E to F and a lower terminal Top Speed.

So, essentiailly we are balancing the benefits in A-D against the penalties from high downforce in E-F. We are also adjusting the relative front vs rear settings to achieve the optimum overall speed through the corner.

Developing a keen sense of whether the car is understeering or oversteering in various sections is critical for making adjustments—of wing settings and rake, as well as many other set-up settings. 

So, always be aware of what the car is doing in sections A-B, B-C, and C-D. A-B is Corner Entry, B-C is Mid Corner and C-D is Corner Exit. There are many definitions of understeer and oversteer. The engineering definition has to do with “slip angle”. Slip angle being the difference between the actual line of tire travel as compared to the line of travel that would occur with the tire rotating without any slip.

Here is my simple definition from a driver’s point of view—Understeer is where the car is rotating and changing direction more slowly than you would like. Oversteer is where the car is rotating and changing direction faster than you would like.  So, by my definition, understeer and oversteer, like beauty “is in the eye of the beholder”.  A veteran pro driver once told me: “When the car is understeering, you see the wall as you hit it going forwards, but when the car is oversteering you hit the wall going backwards.”  

When we get to the final fine tuning, we will use tire temperatures to help bridge the gap between the driver’s point of view and the engineering definition, but at the start, focus on the driver’s perception.

 OK, again. “How do I choose a starting point?” 

There are two schools of thought on this. One is to start with low downforce—optimize the handling with the ideal chassis adjustments and then add downforce for additional cornering speed. I prefer instead to start with high downforce and a “baseline” chassis setup. The driver goes out and pushes the car hard, “driving it like he stole it”.  With the extra downforce, the car will theoretically have reserve grip and recovery from mistakes is easier.

BTW—When I refer to “baseline” chassic setup, I AM NOT referring to the Baseline provided by iRacing.  I will address “How to build three baseline setups” in a later article. For now, use the setup you liked the best for Mazda Laguna Seca for a starting point. If you have no clue—use the iRacing “low downforce” setup, and change to 800# springs all around, reduce fuel to 2 gal, and set Rear ARB to P1 Stiff as a starting point.

High Downforce Setting

We will have a discussion regarding the FR2.0’s special three spring, monoshock front in another article,  One should realize that roll stiffness on this design is achieved very differently than with the conventional four spring suspension found on the Pro Mazda for example. And, the rear ARB will produce much different effects. One can achieve increased roll stiffness by increasing rear spring rates, but again, the resulting effect will be different than on other cars. We will go into this in more detail later. 


So, follow the advice of the experts, Jordan and Eugster.  Start with 31 front and 15 rear. Leave the front wing alone and test reducing the rear wing from 15 down to 12. Choose the rear setting that gives you the most comfort (understeer vs oversteer in the fast corners) and best lap times. Then, test the other setup variables changing from your original baseline settings.  When you feel you have a “balanced” race car, with the right balance of understeer and oversteer that suits you, as well as tire temperature “balance” front to rear on the same side, keep driving to improve your lap times until you consistently get close to your optimal lap time consistently over 3 or 4 laps. Note your top speed at the end of the longest, fastest straight.  (Compare this to other laps you can see on iSpeed, iAnalyze, VRS, or YouTube videos. I always view Thomas Jordan, GTROS (Spanish) and Apex Academy, as well as other drivers’ YouTube videos and always gain some insight/s.)


More or Less “Balanced” regarding Tire Temps (Note camber will make inside warmer)

A reminder: Higher downforce produces the biggest advantage in the Mid Corner Zone, although the relative front vs rear wing setting is also very important, Too much relative rear wing will cause understeer; too little will cause oversteer. In addition, the ideal front vs rear wing settings are affected by other set-up parameters, such as spring, damper and camber settings as well as rake.  So, if the car is understeering or ”pushing” in mid-corner, reduce rear wing a click and try again. If the car is oversteering or “loose” in mid-corner, consider adding rear wing, or reducing front wing a click. (One remedy to a car that rotates too quickly (oversteers) at the beginning of the mid corner is to use “maintenance throttle” but generally there are other more effective ways of dealing with that on the FR2.0.)

Keep in mind the car will not be the same in every corner, so the final “best” is the setting that produces the best overall lap time. Concentrate most on the corners where you using 4th or 5th gear in Mid Corner--downforce is big at 100 mph+. 

Now, test running with lower downforce. Reduce front and rear wings, maintaining the general relative balance between the settings. You will see your top speed increase. You will probably also note significant changes of understeer and oversteer in various corners which may require minor setup adjustments. Continue to reduce downforce as long as your lap times improve.

Note: If you hit the rev limiter in 7th gear only briefly, you may wish to leave it in low 7th , especially for lone qualifying or time trials. In a race, where drafting might be very important, consider going to the high 7th.


Medium High Downforce Setting

One big word of caution. Often, drivers make adjustments to the setup as they are practicing and see lap times improve. They mistakenly assume the setup adjustment was the cause, when in fact, it was simply their driving that improved.  Always go back and reverse the change to see if the perceived advantage from the setup change disappears.

Another word of caution. Often drivers will see their lap times improve when they reduce downforce because they did not utilize all of the tire grip when using the higher downforce settings.  Higher wing settings will provide higher grip and more cornering speed—and to a point—the faster you go through the corner, the faster you CAN GO through the corner. So be sure you are driving the car to the limit all the time during your setup testing. Most inexperienced drivers do not achieve the ideal slip angle for the rear tires, so keep in mind that the car will go faster if you sense a slight oversteering tendency in the Mid-Corner and Corner Exit.

Medium Low Downforce Setting

Ultra Low Downforce Setting

Other than LeMans, the Medium Low Downforce Setting is probably as low as most drivers will ever need, so I assume that the practical range is:

Front Wing:     24---31
Rear Wing:       5---15

Warning. iRacing tinkers with the physics from time to time, so you should assume that some of the “perfect” settings will need to be revised from time to time after updates. (Many can remember that issue in the Pro Mazda.) The process presented here for determining the perfect setting for you should continue to apply.

With experience, you will develop “intuition” and will be able to home in on the correct settings quite quickly.  You can also cheat a bit by discovering what other fast guys are using. But, as I have said—no two humans are the same and often the best setup for you is NOT the same as another guy is using, especially when the other guy has earned an iRating a few thousand points higher than yours.  And, to a degree, wing settings are dependent on other setup settings.

Finally, remember that all humans make mistakes, and in a race, you will encounter many unexpected circumstances. Be sure you have a final setup for your race and time trial that has some “reserve” handling that allows you to maintain control.


Monday, December 25, 2017

Aero and Gearing Setup for the iRacing FR2.0 Part 1

Aero for the iRacing FR2.0
Wings, Rake and Drive Train--The Data


Intro:

Being able to go through corners at a high rate of speed is an important characteristic of a race car. This is in addition to the car’s ability to accelerate and attain a high terminal, top speed.

The cornering speed is dependent on grip produced by all four tires. Grip is highly dependent on the downward force of the tire against the pavement.  Adding weight provides more grip, but comes with the cost of higher inertia in the corners.  Since the additional grip from added downward force is not “linear” meaning that it has diminishing returns, adding weight actually reduces cornering speed.

But, with aerodynamic downforce, there is no additional weight, just downward force produced by air flow over the body and wings. Hence, significant grip is added and significant higher cornering speeds is achieved. An added benefit is that the added grip actually increases exponentially with speed.  With aero downforce, more speed produces more grip which allows more speed
.
Aero downforce is a relatively new technology. Before the 1970’s, cornering g-forces above 1.5 were impossible. Today, some really fast cars are generating cornering g-forces at the 4.0 level. Here is a link for more background about race car aero:


Now, let’s focus on the iRacing FR2.0. There are essentially five (5) different adjustments that will affect changes to aero downforce and drag: 1) Front Wing Setting (14-31); 2) Rear Wing Setting (4-18), 3) Front Ride Height, 4) Left Rear Ride Height; and 5) Right Rear Ride Height.

More wing produces more downforce which provides more grip, but comes at the cost of more aerodynamic drag which reduces acceleration and top speed.  The process of optimization is much more complex than the concept. Often the best result is achieved only through a series of experiments or trial and error. And, such experiments take less time if you know the generally expected cause and effect from your changes, and if you have a reasonable starting point.

In addition to wings, downforce is affected by ride height.  Ride height affects two types of downforces, ground effects at the underside of the car and downforce from the incline or rake that it produces by air pushing on the top of the car’s bodywork.  Both of these types are affected by the rake or the amount the rear is higher than the front.  Ground effects become more important as the front ot the car is lowered, reducing the amount of air that flows under the car from the front.

Testing:

Knowing the “best” settings and more importantly the effects of various settings requires testing and experimentation. So, let’s go to our “test track” that I use for testing aero effects in iRacing. I take the FR2.0 to Talladega, the longest (2.66 mile/4.28 km) oval track available. We use telemetry to measure speed and ride height at the fastest flat section.


Here are the initial settings “A”:

Front Spring (700#)  Ride Height (0.658”)
Rear Springs (800#)  Ride Height L/R (1.046)
Static Rake  1.046-0.658 = 0.388”
Rear End  Standard 9/30
7th Gear  High
Front Wing: 31 Max
Rear Wing:  18 Max

We will refer to this as Max Wing, Min Rake

A Results (Max Wing/Min Rake):
Top Speed of 152.1 mph (7300 RPM)
Dynamic Rake at Top Speed  0.540-0.440 = 0.100”
Front Pushed Down at Top Speed  0.218” (33%)
Rear Pushed Down at Top Speed 0.506”  (48%)

We then changed the wing settings to minimum while keeping all else the same. This we refer to as the “B” settings with Minimum Wing and Minimum Rake:

Front Spring (700#)  Ride Height (0.658”)
Rear Springs (800#)  Ride Height L/R (1.046)
Static Rake  1.046-0.658 = 0.388”
Rear End  Standard 9/30
7th Gear  High
Front Wing: 14 Min
Rear Wing:  4 Min

B Results (Min Wing/Min Rake):
Top Speed of 157 mph  (7500 RPM—Hit Rev Limiter)
Top Speed of 159 mph  (7250 RPM—Rear End 10/30 with Low 7th Gear)
Dynamic Rake at Top Speed  0.660-0.560 = 0.100”
Front Pushed Down at Top Speed  0.098”  (15%)
Rear Pushed Down at Top Speed 0.386”  (.37%)

We then changed the rear ride heights to increase Static Rake, while keeping all else the same. This we refer to as “C” settings with Minimum Wing and Maximum Rake:

Front Spring (700#)  Ride Height (0.660”)
Rear Springs (800#)  Ride Height L/R (1.343)
Static Rake  1.343-0.660 = 0.683”
Rear End  10/30
7th Gear  Low
Front Wing: 14 Min
Rear Wing:  4 Min

C Results (Min Wing/Max Rake):
Top Speed of 158 mph
Dynamic Rake at Top Speed  0.880-0.530 = 0.350”
Front Pushed Down at Top Speed  0.130”  (20%)
Rear Pushed Down at Top Speed 0.463”  (34%)

So the A, B and C settings provide insight as to the effects of wing and rake settings over the entire range, from minimum to maximum.  While it is theoretically possible that a rear wing setting higher than 15 might be beneficial, personal experience indicates that a settings of 31 Front and 15 Rear with the maximum rake would be considered HIGH DOWNFORCE.

So let’s test that as “HDF” settings:

Front Spring (700#)  Ride Height (0.660”)
Rear Springs (800#)  Ride Height L/R (1.343)
Static Rake  1.343-0.660 = 0.683”
Rear End  Standard 9/30
7th Gear  High
Front Wing: 31 Max
Rear Wing: 15 (3 clicks below Max)

HDF Results (Max HDF Wing/Max Rake):
Top Speed of 152.1 mph
Dynamic Rake at Top Speed  0.820-0.400 = 0.420”
Front Pushed Down at Top Speed  0.260”  (39%)
Rear Pushed Down at Top Speed 0.523”  (39%)

Note 1: The HDF setting with Low 7th and 9/30 Rear hit maximum speed of 149-150 at Rev Limiter RPM of 7500.  Essentially the 9/30 Rear is used almost at every track, and the High 7th is used when top speed above 149 mph is desired and achievable. 
 
Note 2: Changing the Front Spring in the HDF settings to 800# resulted in a 0.2 mph faster speed of 152.3 mph, with Dynamic Rake of 0.820-0.460= 0.360”


Next we test changes in cornering force:


I took the FR2.0 to the Centripedal Test Track--ran it on the band/lane, 4th in from the outermost band/lane. Morning Default. Normal race settings, with 25/4 wing settings. (This is minimum rear with front set for a "balanced setup" using tire wear/temp.) Max steady speed of 125mph. Increased to 31/11 wing. Max steady speed increased 3 mph to 128. (Tire pressure does matter as I was 0.5 mph faster with 1 psi increase.)

Increasing downforce can result in higher cornering speeds of 3 mph, with a corresponding decrease in top speed of 3 to 5 mph IF speed above 150 mph with low downforce is achievable.

This is a lot of data to digest, so I will provide an additional article with more discussion in regards to how to apply this knowledge in Part 2. 


Sunday, December 24, 2017

Basic Set Up Training for the iRacing FR2.0

Basic Set Up Training for the iRacing FR2.0


Intro

For the benefit of the iRacing FR2.0 “community” I will be sharing a series of articles.
This series of articles is not intended to impart every bit of race car wisdom ever discovered.   They are intended to provide a foundation of knowledge that will allow you to “build” a setup that will allow you to race at a reasonably competitive level as compared to others with similar physical abilities and racing experience.

I am a Mechanical Engineer who has studied vehicle dynamics for nearly 50 years.  Over the years, I have developed a reasonable level of competence as a racing driver.  However, I am far from being even close to the abilities of top rated drivers.  Whatever limited success I have achieved in racing has been due almost entirely on “building a faster car” through engineering and development.  So, think of me not as a driver coach, but rather as an experienced Crew Chief or Race Engineer. My goal is not to impress you, but rather to simply be a helpful resource to some. I really love the "sport" of iRacing. I hope this basic info makes the "sport" more fun for those that find it helpful. 

For the FR2.0, there are services that publish setups that have been tested by some really talented drivers. They provide great value to many, especially if coupled with one on one driver coaching.  I highly recommend the one on one coaching offered by VRS and Wyatt Gooden.(A great deal of my knowledge regarding the iRacing FR2.0 came as the result of Wyatt Gooden coaching.) I also highly recommend using the Youtube hot lap videos provided by Thomas Jordan. The Driver61 website by Scott Mansell is also an excellent resource.  But, no matter what resources you use, I submit that you will be a better driver, and will derive much more satisfaction from your racing activities if you understand the basics of how to setup the race car yourself.

Keep in mind, there is no “magic” setup that will allow every driver to become a champion, or even to reach their best potential.  Performance on the track is the result of the “combination” of driver and machine.  Since no two humans are exactly alike, the best setup for each will vary.  In fact, the best setup may vary significantly from one driver to another.

Driving a race car is all about managing forces—directly created by the driver, and those that result indirectly. Think “action” and “re-action”.  Optimizing these forces to achieve the fastest lap is the ultimate goal.

Before we get into specifics---I will introduce a very important basic concept: 

The Balanced Race Car

Every driver input, thru throttle, braking and/or steering introduces a force.  These forces (Engine Torque, Braking Torque, Tire Slip Angle each in combination with Tire Grip) directly produce acceleration, with either a change in speed or direction, or a change in both. Rolling Resistance, Inertia, and Aerodynamic Drag are “resistive” forces that are affected by the race car setup or design.  Resistive forces resist the change of speed and/or direction.  All of these forces are affected to some degree by environmental conditions, such as weather and track condition.

The Balanced Race Car is one that achieves the optimization of all these forces to produce the fastest lap. This “balance” is achieved by the optimum combination of driver input/s and car set up, given a certain car design and a certain set of track conditions.

The concept of optimization is simple to understand when there are only two variables—the concept of trade-off---benefits have costs.  For example: More wing produces more downforce which provides more grip, but comes at the cost of more aerodynamic drag which reduces acceleration and top speed.  The process of optimization is much more complex than the concept. Often the best result is achieved only through a series of experiments or trial and error. And, such experiments take less time if you know the generally expected cause and effect from your changes, and if you have a reasonable starting point.

Here is a simple graph of lap time vs wing angle.  Increasing wing produces more downforce and more grip allowing faster laps until the cost in aero drag begins to outweigh the benefits—you lose more time in the straights than you gain in the corners. There is an optimum setting. Notice that I did not trouble myself with the curve of downforce vs wing angle. That relationship is complicated by the fact that it is affected by speed.  (We will devote an entire article to wing and other aero settings.)

An important assumption of this optimization of wing is that the driver pushes the car to the limit of grip in the braking zone and throughout each corner.  Often, drivers will not do so in their testing and will not gain the maximum benefit from higher downforce.

Most variables are best optimized by direct testing of how changes affect lap times. The “balanced” race car is the one that is the fastest with a given driver under the given track conditions.

Many variables/settings can be optimized more quickly by using the driver’s feedback regarding how the car “feels” in corner entry, mid-corner, and corner exit.  Here the three simple concepts of understeer or push, vs oversteer or loose, vs neutral are important.  Adjustments can be made to the car and driver inputs to optimize the car’s handling—again the optimum being the combination that produces the best lap time.  In the case of most drivers, a car that understeers slightly on corner entry and oversteers slightly in mid corner and corner exit is both faster and more stable—especially in racing conditions with traffic.

Another caution. Often, the cause of a driver’s feedback comment is poor technique. For example, entering a corner too slowly and accelerating too early can often make a driver complain that the car is too understeery. Using VRS, iSpeed, or iAnalyze telemetry to compare the driver’s technique to others is useful in evaluating this.  

One “gauge” of being balanced is tire temperature.  Tire temperature is a proxy or “gauge” of cornering force. When the temps for the front and rear tires on the same side of the car are significantly different, it is often an indication that cornering force is not being optimized.  (This depends on the car to some degree—but for each car with a balanced setup there is an optimal relationship between tire temps for the front and rear tires on the same side of the car.)  If the front tires are relatively too hot, then the car has too much understeer and is wasting available grip and cornering force from the rear tires. If the rear tires are relatively too hot, the car has too much oversteer and is wasting available grip and corning force from the front tires.  There is one exception to this rule—in setting up a car for fast 2 lap qualifying or racing on a very cold track, it may be optimal to run a setup that tends more toward oversteer-if the driver is comfortable.  

If the tire temps are not in balance as mentioned above, the handling becomes progressively unstable on a hot track after a few laps as once the tires exceed a certain temp, they lose grip rapidly and begin sliding more, generating even more heat and temp. 

It may surprise some, but in real life, there is a lot less adjusting of the setup at the track than most people realize. Generally, almost every ideal setup for a given track can be derived by making relatively minor changes to one of three basic setups for a given driver.  So, the goal is often to produce those three basic (driver specific) setups and then use them as a starting point when making the final adjustments to achieve the balanced setup for a specific track and track conditions.

Future articles will cover more detailed info regarding:

Wings, Rake and Aero

Dampers and Springs

Differential Settings

Camber/Caster/Toe

Tire Pressure and Brake Bias

Asymmetrical Setups


Wednesday, May 24, 2017

Brake Force Diagram


Probably one of the least understood aspects of road racing is the need to modulate the brake force when approaching a corner. The above figure denotes the force vs time/distance of a "typical" brake application at the end of a straight, approaching a slow corner. 

The racing car typically has aero downforce proportional with speed. And, even with cars having low downforce, more force can be applied initially before weight is transferred.

Threshold braking is the maximum braking force that can be applied without locking up the tires.

As the car slows, downforce is reduced and weight is transferred to the front. Braking force must be gradually reduced. 

In most instances, a lower brake force can be maintained as steering is added--reducing the brake force as steering is added and more cornering force is applied to the tires. This is called Trail Braking.

Depending on the brake bias settings, trail braking can cause the car to rotate (oversteer), but too much may cause the front tires to be overloaded, causing understeer.  Trail braking is used differently on different cars and in different corners, in different ways to control the car on corner entry. (On some really heavy cars, you never trail brake as it overloads the front tires. On these cars you brake in a straight line and "roll thru" the corner much like driving on a short track oval.) 

An often forgotten phenomenon is the fact that the car typically will tend to rotate when the brakes are released during trail braking.  (It has to do with the fact that upon brake release, the front tires no longer have a braking force competing with the turning force and the front will turn more sharply momentarily.)

The very best drivers will use this phenomenon to apply throttle just as, or slightly before the brakes are released as initial throttle often causes understeer, and the "brake release rotation" oversteer can offset this. 


Saturday, March 18, 2017

Downforce and "Aero" in a Racecar - Pt 1

A critical part of setting up most modern racing cars is optimizing or "balancing" the additional grip in the corners provided by aerodynamic downforce with the associated drag that reduces acceleration and top speed.

Aerodynamics is an extremely complicated subject, even for engineers, so it is not a surprise that many "rules of thumb" are adopted by some, and then defended with almost religious intensity against anyone who challenges the over-simplifications.

The goal of racing is to finish ahead of your competitors.  This is accomplished by any combination of "factors":  a) A faster car; b) A more skilled driver; c) A driver with very fast reflexes; and d) A car/driver able to maintain control in the event of unexpected or unpredictable on-track challenges.

First, for those not interested in over-simplifications, here are links to excellent "primers" for every racing driver/engineer:

Stockholm Seminar Slides

Katz Book @ Amazon: Race-Car-Aerodynamics

Also, I suggest just to "Google" the term "Katz Race Car Aerodynamics" for some papers he has written.

In iRacing, you will quickly find there are spirited debates on the "best" setup.  Each car has it's own forum and "community" and each community seems to have one (or more) self appointed and usually well intentioned "guru" who promotes a certain "rules of thumb". For the most part, I find most of these rules of thumbs to be over-simplifications and often based on faulty engineering and racing principles.


For the most part, this discussion will be about cars running in the iRacing sim, but most of the principles apply as well to real life.  There are some exceptions. iRacing is a racing simulation--a very sophisticated video game.  Being successful in iRacing is somewhat related to being successful in video games. In real life--mistakes are very costly in terms of money and personal injury. In iRacing mistakes are pretty much remedied with a simple reset button. 


A brief history:


As you can see, the widespread use of downforce began in the 1970's. Above is a "wingless" Lotus with essentially no downforce.  (Those who promote the concept of "low downforce is always better" should be drive the Lotus 49--it is a real handfull and much slower than a comparable modern car with downforce.)

The first use of downforce was to use inverted wings--take an airplane wing and turn it upside down. From the photo below, it can be seen that even that did not keep the car on the pavement.


The development over the years has advanced to include spoilers to reduce lift, drag reducing bodywork and "undercar" effects as seen above.

In essence, these graphs shows the benefit from downforce:


Grip, or the amount of lateral force that can be transmitted to the car in the corner increases dramatically with the vertical force on the tire/s AND the slip angle--to a point. So anything that decreases lift or increases downforce increases grip in the corner.

In addition, anything that decreases lift or increases downforce also increases braking and acceleration forces that can be input through the tire.

So..more downforce gives shorting braking distances and faster deceleration, along with increases in lateral cornering forces and less wheel spin on acceleration. Faster corner approach, faster corner speed, and faster corner exit.

Of course, these enormous benefits come with a cost:  DRAG.  For the most part, increases in downforce produce increased drag--sort of like having a parachute attached.


The balancing act is this:

If there is a shortage of grip in the corners (too much sliding or a loss of control) then downforce will increase grip and increase speed POTENTIAL in mid corner. (The driver must utilize some of all of this potential speed.)

If the track requires hard braking, then downforce will allow the car to approach the corner with more speed and will allow it to accelerate out of the corner faster.

But...Increased drag will REDUCE the rate of acceleration and top speed.

For example, lets examine just part of the race track---the long straight along with the corner leading to the straight and the one immediately following the straight:

A) The car with high downforce will enter the straight with more speed.
B) The car with high downforce will accelerate more slowly and will achieve a lower top speed.
C)  The car with high downforce will be able to brake later and harder at the end of the straight.
D) The car with high downforce will travel through the ending corner with more speed.

You will often hear, "With high downforce, you are a sitting duck--you will be passed on the straights".  Well, that depends on how much more downforce you are running than your competitor.
The higher downforce car will be slower for a part, BUT NOT ALL, of the straight. Typically, the lower downforce car will gain significantly in the second half of the straight, up until the braking zone.

But, here is a comeback.

If the downforce produces sufficient benefits, the car with higher downforce may have built a sufficient gap that the speed advantage of the lower downforce car is insufficient to close the gap. (So often, it depends on whether there is a sufficiently long series of turns before the long straight to build a gap--think Atlanta vs Road America or Spa.)

In many cases, the passing process will include the braking zone, and here the high downforce car has the advantage. It is not a certainty that the lower downforce car can complete the pass.

And, a car with higher downforce, can mitigate the speed loss from drag, by using the draft of the car ahead, and then may be able to outbrake the car ahead and complete a pass in the braking zone.

When the last corner of the race is a high speed one, where downforce produces an advantage--like at Indy, I have seen the 2nd place car with higher downforce pop out of the draft, passing for the lead going into T3 and using the superior grip thru T4 to win the race.

But...a "logical" argument for low downforce, even for inexperienced drivers is that it is easier to go fast on the straights than it is to use the maximum corner grip that provides the major speed advantage from higher downforce. This argument assumes that inexperienced driver will brake earlier, drive slower in mid-corner, and get on throttle later than the more experienced drivers.

What I have noticed is that once the less experienced driver witnesses other cars pulling away in the corners, he/she will often push the car harder-invariably too hard---and will lose control.

Let''s review:

The goal of racing is to finish ahead of your competitors.  This is accomplished by any combination of "factors":  a) A faster car; b) A more skilled driver; c) A driver with very fast reflexes; and d) A car/driver able to maintain control in the event of unexpected or unpredictable on-track challenges.

a) There is always an "optimum" downforce that will produce the theoretical "fastest" car.
b) A skilled driver will be able to fully optimize the car's speed potential--however it is setup.
c) A driver with very fast reflexes will be able to drive a car with lower downforce.
d) Often, situations occur that require higher levels of grip than normal and anticipated.

The claim that a driver with very fast reflexes will be able to drive a car with lower downforce has to do with the fact that the road surface is uneven and the corner radius is not constant. Grip requirements change thru the braking zone and through the corner--requiring lots of changing driver inputs. A higher downforce will produce some "reserve" grip---not needed by the driver with lightning fast reflexes, but quite beneficial for the driver with slower reaction times. This holds true also in those unanticipated track events that invariably occur in racing traffic.

In conclusion:  1) Downforce settings are driver dependent--each driver may require or desire a different level; 2) Having a certain level of "reserve" grip  from a higher downforce can be beneficial; 3) The lowest downforce nor even the theoretical "fastest" car will NOT win races with more frequency than a car with a reasonable level of "reserve" grip in the hands of a skilled driver who can "fully optimize the car's speed potential"--however it is setup.

A marginal excess of downforce, if not excessive, is not like "training wheels" for beginners. In fact, a marginal excess of downforce, while admittedly helping some less experienced drivers, will often provide the greatest benefit to the most experienced driver who has the knowledge and skill to optimize the car's speed potential.

My personal opinion is that the best or "optimal" setup is not the one that produces the fastest hot lap, but rather the setup that provides the fastest average speed over about ten laps, with the least variation or standard deviation from the average.

Note:  Keep in mind that increasing downforce only helps if there is a shortage of grip. Here is a test:

Take iRacing's HPD Prototype, set it for LOW downforce and run it flat out at Indy. You never lift nor slide. (There is no shortage of grip.) Using MEDIUM downforce will result in lap times 4% slower.  Then do the same test at The Milwaukee Mile track.  Even though the MEDIUM downforce car will be slower on the straights, the lap times will be around 3% faster than the LOW downforce setup.

Even a modern race car with lots of downforce will fly 😎: