The "Latest" Rig

The "Latest" Rig
Bodnar Wheel w HPP Pedals (Added Rift in Summer 2017)

Friday, January 12, 2018

Baseline Setup for the 2018S1 iRacing FR2.0

Baseline Setups for the iRacing FR2.0


Intro:

The most difficult part of building a setup is often “where to start”.

This article presents a “Baseline” setup, applicable to the iRacing FR2.0 version 2018S1.

The Baseline setup provides a starting point, from which the specific setup for each track and set of conditions is built by the individual driver, through a series of iterations during a testing session or a series of testing sessions.

The basic knowledge required by the driver for this process has been touched on in the previous articles presented.  A regular review of those is suggested.

Keep in mind that the setup will not make a slow driver fast.  Once the car handles reasonably with the right aero downforce, the majority of the difference in lap times achieved by different drivers is the driver inputs. 

And, my personal observation is that 20% of that is choosing the “optimum” racing line, and 70% is how the driver manages the car during the critical “deceleration” stage from the time the throttle is lifted for corner entry, thru the braking zone, to the mid-corner/apex zone where throttle is again applied. Finally, recognize that knowing what to do, and doing it are two very different things. Many drivers know what to do, but do not have the physical capability to execute.
  
So, first, I will present the “Baseline-FR2.0v2018S1”


Baseline Set Up


The file for download from Dropbox. Here is the link:


Discussion of the Process for Each Track (Road America Example)

As an example, we will take the Baseline set to Road America. First test will be running the Baseline at Time Trial conditions: Afternoon, No Wind, 78F, Partly Cloudy, 35% Track State.


My Time: 2:04.983 for reference using the unchanged Baseline Setup above.

It will become obvious that the car is being burdened with too much drag from too much downforce. So, the first step is to reduce the wings. 
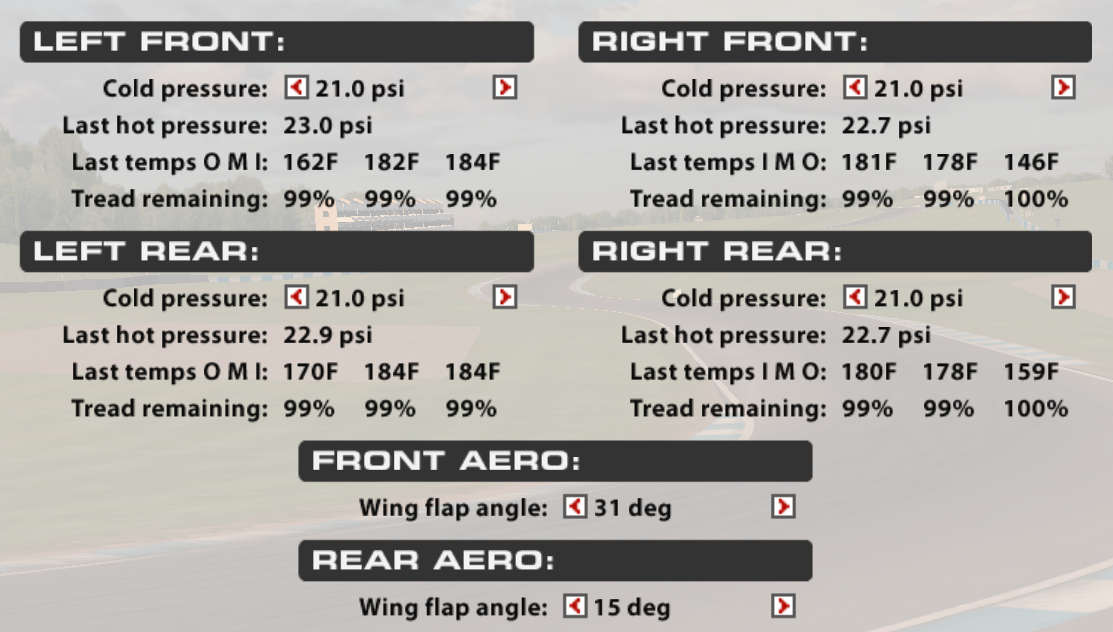
We will start by adjusting the front wing down by 2 “clicks” from 31 to 29. Then, adjusting the rear wing down by 3 “clicks" to 11 so as to maintain close to the same 42.x % Front Downforce in the Aero Calculator provided. (While changing ride heights changes how this calculator works,  I prefer to leave the ride heights in the calculator fixed.)

Since this is clearly a relatively fast and smooth track, let’s try changing the front spring from 800# to 700#. This will drop the front end lower—especially at high speeds with downforce on the front wing. Let’s also try reducing the “rake” by lowering the rear ride height 0.40” (1mm) by adjusting both left and right rear Pushrods shorter by 4 “clicks. (On a bumpy track or a track where you run over curbs, I would leave the 800# springs alone and raise the ride height, front and rear a bit.)

My Time with 29/11 Wings: 2:04.624

Improved 0.359 seconds, but first laps with lower DF, I was actually slower. Had to get used to the lower DF.

Note: For drivers who like a really stiff car, choose the next 100# higher spring rate spring, front and rear.

While running with the lower wing and rake settings, take note of the top speed at the end of the longest straight. We are just hitting the rev limiter, so the car is not “constrained” by aero wing drag. Since it is only briefly, we will choose NOT to change the 7th gear ratio and will keep the one with more torque/less top speed.

Now, also take notice of any handling issues you would like to “correct”.  And, review your lap in “chase” mode, setting your “Z” camera angle to view the gap between the track and the bottom of the car. Watch for sparks indicating that the car hit the track and is too low. If too low, just increase ride height as required.


I noticed that the car tended to be a bit loose (oversteer) under full throttle in T13 (Bill Mitchell Bend) and was perhaps too understeery in T1.

The understeer in T1 could be corrected by reducing rear wing one click, but that would make the problem in T13 worse. I might also change the rear ARB, but, making the ARB less stiff to correct T13, would probably make the car more understeery in other corners.
I also noticed that the car seemed a bit unstable under heavy braking approaching T5. 

Reducing the Rebound stiffness on the rear dampers 2 clicks to would slow the transfer of weight rear to front during braking and slow the transfer of weight side to side in T13, making the car less loose or oversteery. So I adjust the rear Rebound stiffness from -1.00 to -1.25 on both sides. (This reduction in rear Rebound damping often will allow better handling—but not always—there are some tracks where you do not want to slow the weight transfer and increasing the Rebound setting from -1.00 to -0.75 or -0.50, speeding up the weight transfer can be productive. This is particularly true for drivers who prefer to have the car more oversteery under braking.)  

In the third run, the car feels pretty good.  

My Time: 2:04.480 (Would have been in top ten hot laps in Time Trials 10/2017)

I then change the weather to Mostly Cloudy and make a fourth run. (I find this makes up for my slow reaction time and my time usually is on par with the fast guys running on sunnier track.) I also changed the wings settings down one click to 28/10-the same 42.x % front.

My Time: 2:03.113 (Optimal 2:02.85)  Pretty quick—fastest Time Trial Hot Lap in 10/2017 was Fredy Eugster at 2:03.297 and the David Williams Forum Demo Time was 2:03.856


Finally, set the Fuel level to 7.9 Gallons (30 l) and make a fifth run—this time also checking the car’s ground clearance with the chase camera.


As a final test, I will reduce the fuel back to minimum 2 Gallons and reduce wing settings to search for better lap times, and make other adjustments as required to address any new handling issues noted that I think I can improve with setup changes. Often, experimenting with damper settings can achieve some improvement.  For advanced drivers, sometimes decreasing front brake bias is productive. And, read the article about differential settings as this may be an area where driver preference comes into play--the Baseline set will have a bit of understeer on corner entry and assume the driver uses trail braking to help rotate the car to the apex.

Montreal Example

Another example. Try out the BaselineDWS Set running Montreal (Gilles Villenueve). First thing to consider is the chicanes here with the large sausage curbs. 

To make the car more "tolerant" of contact with the curbs, whether on purpose or by mistake, I softened the compression settings for the front damper from 10 to 20, and the compression settings for the rear from 10 to 15. I also reduced tire pressure from 21.5 psi to 21.0.

The car was a bit loose and oversteery in the chicanes and front tire temps were higher than rear , so I changed the wings from 31/14 to 29/15--a lot more rear downforce in proportion to front.  To make the car more "responsive" in the chicanes I increased rebound damping from -1.0 to -0.75 front and rear. 

Car felt good, but i was getting wheel spin in the slower corners so I dropped, ARB from P3 Soft to P2 Soft.

Tire temps were very balanced and the car achieved good lap times at Time Trial conditions. 

Not many changes required. I reached this result in less than 30 minutes. Then I proceeded to try all kinds of additional changes, with no improvement. 

Here is the set for download from Dropbox.

https://www.dropbox.com/s/csbzqfcvob9iita/Montreal01192018DWSv1.1.sto?dl=0

https://www.dropbox.com/s/csbzqfcvob9iita/Montreal01192018DWSv1.1.sto?dl=0


(The VRS set for the same track conditions was MUCH stiiffer, with less wing. But, it was not very tolerant for mistakes. 1 mph faster at end of long straight but the lower wing hurt times in the chicanes. )

My previous experience here is that you will see a few impressive hot laps at Montreal, but mistakes are so prevalent that actual Q and Race times are almost always much slower, so a car that is reasonably tolerant to mistakes (hitting curbs) is usually very competitive. 

On a hot track, I got good results by simply adding wing, changing to 30/17 

Conclusion

These examples are by no means exhaustive. Keep experimenting. Review the articles about the various setup parameters.

In fact, in time, you may choose to create your own “Baseline” for the starting point.
I am sure many drivers will simply respond to this article with the comment, “I already knew this stuff” or “I can do better”. Fair enough. There is no perfect setup and often there are several that achieve similar results—just differently. These articles were designed for newcomers and those with iRating below 2500. The advanced guys do already know most of this “stuff” and I am not in the top tier of drivers.  But, I will say, that in building the Baseline setup, I was actually surprised at how few changes were needed to adapt it to each track. Usually only two or three changes. 

Building setups this way is quick and fun. Sort of practice for the race. By the time you get the setup the way you want, you are hot-lapping at near your best times. 

Wings and rake can make a big difference.  A couple of tracks required a higher 7th gear. A couple tracks liked a softer ARB.  Tinkering Front Toe Out and Rear Toe In and tinkering with dampers was often productive.  

Take notes for each track. They will be helpful for future tracks and seasons.
Keep in mind that iRacing changes the physics from time to time. Each Season you will probably need to retest your setups.

I hoped you have enjoyed the series of articles and I hope they will help many guys to be competitive and enjoy this great activity. 

Blessings,

Donald


My Brief NASCAR WINSTON CUP Career

My Favorite Race Car-1986
Competing at SCCA Runnoffs at Road Atlanta against future IndyCar driver Jimmy Vasser.
Swift DB1-This exact car won two SCCA National Championships (with other drivers after I sold it with special dampers and engine) The most wins by a DB1 in history. 


Thursday, January 11, 2018

Asymmetrical Setups for the iRacing FR2.0

Asymmetrical Setups for the iRacing FR2.0


Intro:

Generally speaking, since the FR2.0 is run on road courses, the car needs to be equally agile in both right and left turns.  There are however a few courses where lap times can be improved by making the car turn better in right turns than in left turns and vice versa.

When we set up the car to turn better in one direction than the other, the setup is deemed to be called “Asymmetric” or lacking in symmetry.


The art of making a car turn in one direction better, without concern for the other direction is essentially a major part of setting up a car for oval tracks.  Note the diagram of the Lotus that won at Indy.

F1 has a recent history of some subtle use of asymmetry in applying aero. See article in link:

https://www.motorsport.com/f1/news/bite-size-tech-toro-rosso-str11-asymmetric-cooling-687756/

And, nothing will teach you more about asymmetrical setups than racing on a dirt oval with limited traction and grip. Remember that we cannot adjust front Caster on the FR 2.0, so that common adjustment used on ovals is not available. But there are many other settings to use.

On road course setups, any asymmetrical setup settings are necessarily subtle as the car still needs to turn well in the opposite direction.  While most road courses where an asymmetrical setup would be beneficial run in the clockwise direction, for the purpose of this article, I am assuming that we are trying to make the car left better than right—following the oval anti-clockwise left turn convention.  

For right hand turn preference, simply do everything on the other side. (I chose the left preference for this article to be sure that any application by the reader for the more normal right preference in road racing to be only after thorough thoughtful consideration and analysis. This a very advanced technique and should be used only after you have mastered all the other setup parameters.)


Balance

Other than driver feedback, the only analytical indication of a “balanced” race car is tire temps and wear. Below is an example of a reasonably well balanced race car where tire temps front to rear are close to equal on the right side, but the left side tires are being stressed slightly more.


Baseline

Below is a symmetric car. Note the Cross weight: 50%, the Corner weights, and the ARB Preload -0.1 to +0.1.


Spring Change

Let’s assume that we would like to make the car turn a bit better to the left because we have noticed the car is understeering a bit in left turns and the right front tire is running hotter than the right rear.  We could change the right rear spring to 900#. This would make the car rotate faster and oversteer more.

Note the ARB preload has been adjusted to 0.0. The Cross weight is now 48.8%. The total weight of the car has not changed, but the LR and RF together are no longer 50%....they are now less = 271+360 divided by 1294 = 48.8%

Essentially we have made the right rear of the car stiffer (reacts faster to weight transfer) and have increased the weight on the LF and RR by 8 pounds each or a total of 16 pounds.  We have reduced the RF and LR by the same.  

So in a left turn, the right front will have less weight, less heat and tire temp, but more importantly, the left front will have more weight and more grip while the left rear will have less—the result—the car will have less understeer in the left turn.

On Legend cars running on dirt in real life, we would have different spring rates on all four corners depending on the track. Sometimes a bigger spring on the inside rear to give the car more understeer “bite” coming off the turn—sometimes with a bigger spring on the outside rear to make the car rotate faster on throttle in mid-corner.


As shown above, one could accomplish something similar by simply adjusting the ARB preload, without changing the spring, but this is usually not recommended.  Mostly because, at least theoretically, it can cause the inside tire (LR) to lose traction.


Weight Jacking

Rather than changing springs, the most common adjustment is adjusting Pushroad length. In NASCAR, this is called adjusting “wedge”.  Indy Cars actually have an in-cockpit adjuster to perform this change. At Indianapolis, the Weight Jacker is often adjusted differently for each corner!


Adjusting wedge or Pushrod Length changes the Cross Weight. In this example to 48.3%, with 11 pounds each added to the LF and RR by increasing the RR Pushrod length by only 0.027in (0.7 mm). This is probably the most you would ever want on a road course setup. This will have a similar effect as changing the spring, but with less change in the handling immediately after throttle application.


Tire Pressure

One way to make a subtle change is to change the tire pressure, increasing the RR and LF or decreasing the LR and RF. (Increasing tire pressure is like increasing Pushrod length as it makes the tire larger in diameter.) This is essentially what people are doing when they adjust tire pressures on each corner to gain equal 160 kPa pressures, for example.


Rear Steer

Another, less common, but still effective way of making the car turn faster is to introduce “Steering” or a “rear slip acceleration” by pointing the rear tires outward in the corner- the inside tire having toe-in, the outside having toe-out. As shown for a left turn bias:


Camber

Reducing the negative camber on the inside tire will give that “axle” more relative grip. So to make the car turn better left, by decreasing understeer, simply decrease the negative camber of the inside front tire.


Sometimes, we are not seeking a change in the understeer/oversteer balance, but rather to just give the car more overall grip in one direction.  In that case we would reduce BOTH the front and rear camber on the inside of the corner we wish to improve.


Remarks

Keep in mind that on most road course, what is gained in one corner is likely to be lost in another, so generally asymmetrical settings should be limited to improving handling on “more important” corners that lead to long straights.

From personal experience, asymmetrical settings have provided benefits at Lime Rock and Silverstone for example.  Limerock is almost an right hand oval with only one left hand turn. Silverstone’s two longest straights were punctuated at the beginning and end with right hand corners that benefited with slight asymmetry--reducing the weight on the LF helped reduce understeer in these important corners.

Like all setup settings—test, experiment and test some more. (Watch for tire temperatures showing “out of balance” and push the car hard in all corners to test limits.)


Tuesday, January 9, 2018

Tire Pressure and Brake Bias for the iRacing FR2.0

Tire Pressure and Brake Bias for the iRacing FR2.0


Intro:

The “science” of tires very complicated.  A little background (which I will provide) is interesting, but the most important thing to remember is that the iRacing FR2.0 is a “Spec” series, which means, we have one tire supplier---iRacing.  The characteristics and performance of these “Spec” tires is entirely determined by the “Tire Model” that iRacing has provided.

There is much debate as to just how close to “reality” the iRacing tires perform. Like, beauty, the performance is subjective and “in the eye of the beholder”.

The complete details of the iRacing “Tire Model” is probably as secret as the formula for Coca-Cola.  But, we really only need to focus on the things we control—in this case Tire Pressure, as well as Camber, Toe and other settings that affect handling.

Keep in mind that iRacing regularly revises and adjusts this “Tire Model” so conclusions we draw here need to be re-validated each time a revision is made.


The Science

Newton’s Three Laws of Motion and Einstein’s Theory of Relativity were important and profound “breakthroughs”. In the science of tires, the Magic Formula (really..that’s the name they call it) put forth by Hans Bastiaan Pacejka, a Professor at the Delft University in the Netherlands, is equally as important. After, this formula was presented, another called the Brush Tire Model was postulated by a couple of Swedish engineers.


Pacejka’s Book:

Brush model:
http://folk.ntnu.no/skoge/prost/proceedings/ecc03/pdfs/317.pdf

Essentially:


Which is the basis for the curve you see below:


Every iRacer interested in the “Story” of tires used in iRacing must read:


Written by Dave Kaemmer, Co-Founder of iRacing, it gives invaluable insight. He calls the zones in the drawing above: Linear No Slip Zone, Limit Zone (Driver’s “Office”), and the Scary Zone.

Opinions regarding iRacing’s Tire Model for the Linear and Limit Zone are generally high. What happens in the Scary (Exceeding the Limit) Zone is where most of the controversy comes from—particularly when it comes to how the tire’s performance varies with track temperature. (See end of Article)

Another article for you engineering types is in the following link. I lifted the next diagram from their article.    https://www.hindawi.com/journals/mpe/2013/261582/


In addition to the issues regarding grip, the “model” of the tire requires one to think of it as a spring and damper in “series” with the race car suspension.

So, we have a basic relationship between grip and slip angle as illustrated by the “Magic Formula” curve. But, this curve is radically and profoundly affected by the tire compound (soft vs hard) and tire pressure and track temperature. And, the performance of the tire is different during transition from steady state to loading and unloading.

Added to the changes in grip is the change to the overall car’s suspension that occurs with inflation pressure changing the “tire-related damping and stiffness”.

So, do you really think the simple Rule of Thumb, “Just set tire pressures so the hot pressure is 160kPa (23.2 psi)” is adequate?  It might actually be close—but’s let’s do some analysis.

In closing the discussion about “theory”, here is an excellent article that will provide some useful info:   http://racingcardynamics.com/racing-tires-lateral-force/

So the contact patch, that little patch of vulcanized rubber touching the racing surface is squirming and moving all the time.  A portion of the contact patch may be in the “limit” zone while another portion is in the “scary” zone. All of this is changing as the car goes around the track.


The way the car feels and tire reacts in the “scary” zone depends a lot on temperatures. While vulcanized rubber does not burn, it does get more “slippery” when hot—and the temperature “when hot” depends a lot of the tire compound. The way the car feels and the tire reacts in the “scary” zone also depends on the road surface.

A word about the spring/damper concept. When you put springs end to end or in “series” the “overall” spring rate changes a bit differently than most think.  Two 800#/in springs in series have a combined or “overall” spring rate of 400#/in.  400#’s compresses each spring by a half an inch, but the total movement for the 400# force on both springs is 1 inch, so the overall spring rate is 400#/in.  Adding tire pressure will increase the spring rate of the tire, but the overall % increase in stiffness of the car will be less than the increase in stiffness of the tire. Increasing tire pressure will reduce the overall damping of the total combination.  

In all cases, changing tire pressure will not only affect grip, but will also change the transitional handling characteristics of the car—just like changing springs and dampers.


By doing some tedious calculations, you can determine a rough “estimate” of the spring rates of the car.  By adding fuel weight and checking changes in ride height, one can estimate that the “overall” spring rate of each “corner” of the car is around 450#/in. (79 N/mm). 

Then one can change tire pressures and note changes in ride height. And, one can change springs and note changes in ride height.

Some needed info is missing to be exact, but with some trial and error and other knowledge, one can estimate that at 21.5 psi (148 kPa), the spring rate (fspring1 above) is approximately 1125#/in (197 N/mm).  Reducing pressure to 20.0 psi (138 kPA) reduces the estimated tire spring rate to 1046#/in (183 N/mm) or almost proportionately to pressure.

What this means is that with 100 pounds of extra load on the tire (aero downforce, cornering or braking weight transfer) the tire is compressed by about 0.080 in. (2 mm). More tire pressure, less compression. But, it also means that changes in tire pressure make relatively small changes in tire compression. Changing from 21.5 psi (148 kPa) to 21.0 kPa (145 kPa) only changes tire compression by 0.002 in. (0.06 mm).

Still, as a rule of thumb, changing the tire pressure by 0.5 psi (3 kPa is like changing the suspension spring by 20#/in (3.5 N/mm).


Practical Considerations

First, let’s test the car to see what effect changing pressure has on lap times, under varying track temperatures. For this, let’s take the FR2.0 to the Martinsville Oval—probably a good “model” for tire pressure effects in high speed corners as we are cornering at 100+ mph.

I ran many laps. Each run was designed to test lap times and hot pressures as well as tire temps.

I could find no advantage in differing pressures front vs rear.  Despite the fact the FR2.0 has different size fronts compared to the rears, it appears that pressure front and rear should be the same.

Starting off at Time Trial Conditions (Warm track) with 21.5 psi (148 kPa) cold with tire warmer, I achieved a good lap time of 18.6 seconds. Hot pressure was the magic “160” kPA.

Taking the pressure down three clicks to 20.0 (138kPA) cold, Hot pressure was 150.  Lap time was off by 0.2 seconds or 1%.

Starting at 21.0 psi (145 kPa) cold (one click lower than the 21.5/148) I achieved the same good lap time of 18.6 seconds. Hot pressure was 158 kPa)  The car felt like it had more understeer at corner entry, but hooked up better with less oversteer on corner exit as compared to the 21.5/148 setting.

Starting at 22.0 psi (152 kPa) cold (one click higher than the 21.5/148) I also achieved the same good lap time of 18.6 seconds/ Hot pressure rose to 165 kPa.  The car felt like I was 4 wheel sliding a lot thru the entire corner and the tire temps showed signs of slight over-inflation.

Based on these results I concluded that the 21.0/145 cold and the 21.5/148 cold settings were very close in performance.

Next I tested these two settings at an extreme Hot track (116F) and again at an extreme Cold (74F) track.

At the Hot track with 21.5/148 I ended with 162 kPa. With 21.0/145 I ended with 159 kPa.  Both settings produced the same lap times with same difference in understeer/oversteer “feel” in regards to mid-corner, except the 21.5/148 setting produced a feeling of more overall sliding. Times on the Hot track were  0.5 seconds, or 2.6% slower than the Warm track!

On the Cold track with the 21.5/148 I ended with 159 kPa. With the 21.0/145 I ended with 155 kPa. Here the 21.5/148 was marginally faster (18.19 vs 18.20) and simply “felt” better. The lap time with the 21.5/148 setting was 0.4 seconds quicker than the Time Trial Warm track conditions or 2.2% quicker.

In all the tests, the rear tires were gaining slightly less pressure and temperature. I ran the tests by boosting cold pressure on the rear to get the final “hot” pressure closer to the “magic” 160 kPa figure—equal to the front. It did not make any significant improvement. I then instead, tried adjusting the rear downforce, which did result in balanced/equal front to rear “hot” kPa, but in this case, lap times improved slightly. 

The testing at Martinsville took into the handling characteristics in transition during the corners as well as grip. To check grip alone, I took the car to Talladega for 155mph  threshold braking tests.

Interestingly, the difference in stopping distance for the 20.0/138, 21.0/145, and 21.5/148 cold settings were negligible. 

For 2018 S1 iRacing version of FR 2.0 Tire Model

Choose either A) 21.0 psi/145 kPa Cold or B) 21.5 psi/148 kPa Cold

At colder (below 105 F) tracks, the 21.5/148 will probably provide better handling and grip.  (The car will however tend to oversteer more on corner exit, so on tracks with hairpin turns and slow chicanes, consider the 21.0/145—this has nothing to do with grip per se, but rather the difference in how the tire transitions from the mid corner to corner exit.)

At hotter (above 105 F) tracks, the 21.0/145 will probably provide better handling and grip.

The 21.5/148 will provide somewhat the same relative “feeling” as a small increase in spring rate.

Additional testing is merited for tracks with hairpin turns and slow chicanes as running the lower 21.0/145 rear and higher 21.5/148 front might be good for some drivers.

Rather than “chase” the “magic” 160kPa hot pressure goal—use the cold setting you like best, and make final adjustments to balance the car using other suspension and/or wing adjustments.  With the current tire warmers, starting with “warmed” cold tires, the difference between setting and final “hot” pressure is less significant.


Warning: All of this could change with one iRacing update.

Do not fall into the trap of self-fulfilling prophecy, where you change tire pressure and see an improvement in lap times--then conclude that you have discovered a profound tire pressure to best grip relationship. If you are convinced that a tire pressure change resulted in an improvement--go back and test the previous setting AND be sure you drive the car just as hard. A confident driver is a fast driver, and often we grab hold of settings where we have become confident, and simply drive the car harder with those settings and higher confidence. 

The biggest aspect of tire performance with the iRacing FR2.0 is the change in grip with change in track temperature.   Affected less by ambient air temperature. Affected dramatically by sun heating of a dark colored track.  It can change from one section of a track to another. It can change with sun angle (morning vs late afternoon) as well as cloud cover and location. Dramatic changes in grip will be evident.

As mentioned earlier, this has been a "bone of contention" for some time and the consensus is that it has improved. (While we all know that drivers at Indy tend to pay attention to sun and clouds during qualifying--some think iRacing has overdone it a bit.)  Related to this is science that teaches us that at the limit, a portion of the tire contact patch is in the "scary-exceeding the limit" while the adjacent portion is not--so if iRacing's Tire Model places a high degree of grip variability in relation to temperature, this may explain why some feel the "scary" zone is more scary than racing tires in real life. 


Brake Bias

There is no perfect setting for this. The best setting depends on many factors.

Lots of weight is transferred from the rear to the front tires under braking.  This decreases the braking power available to the rear tires and increases the chance of rear tire lockup during heavy braking. This is less of an issue with higher downforce from high wing settings and higher speed.

This weight transfer occurs more quickly with stiffer springs, higher compression damping in the front, and higher rebound damping in the rear.

Past a certain point, higher front brake bias is counter-productive as it will lead to pre-mature front brake lockup and increased stopping distance. This is less of a problem on the FR 2.0 because of the unique monoshock front that tends to be less likely to cause inside front tire lockup during corner entry trail braking. (This premature inside tire brake lockup is most commonly noticed in other cars like the PM in the entry to the corkscrew at Laguna Seca and most famously in  the entry to Turn 10 (Bico de Pato aka Duckbill) at Interlagos

With a limited slip differential, higher preload and lower numerical coast ramp angle setting may reduce rear brake lockup of the inside rear during trail braking—calling for LOWER front brake bias. If you feel the coast differential settings are causing too much corner entry understeer, try decreasing front brake bias and using more trail braking. 

Range for the Brake Bias Setting is 55.0 Low to 57.0 High.  56.5 is manageable for most drivers and settings, however drivers that are highly skilled with fast reflexes tend to use lower settings. Lower settings tend to allow faster lap times as long as the driver does not suffer rear wheel lockup. Lower settings allow for more braking in power from the rear brakes and hence a shorter stopping distance---all of which depends on track conditions, car settings and driver skill regarding brake force modulation.

Start at 56.5, and try lower to see if stopping is improved. Raise it to a higher number if “objectionable” rear wheel lockup occurs.